Update: If you want to know how to use link click listener and click listener in new GTM version, please refer to this post.
When I heard about Google Tag Manager for the first time, I think it is awesome. Because firstly, I am not a tech guy and I cannot code for life. And secondly, it said it can make life easier for people like me to handle tags just from the interface and do not have to bother developers and tech guys all the time. So I thought, ok cool, let’s try to use it.
Ah, this is where the fun begins. Although, Google makes Tag Manager looks and makes it easy to use, it still has the geeky part in part, i.e, macros. When I saw these, I know I am in big trouble because I don’t have the slightest idea of what macros are and how I use them to define tags that I want to fire. At that moment, all I want is to go back to javascript and ask for developer to help me with tagging while I just have to define Event Category, Event Action and Event Label.
But after reading this fantastic post by Cutroni, I feel a bit encouraged and want to give it a try. Also, I have to admit that I am keeping up this blog just to play around with Google Tag Manager and Google Analytics so yeah why not test it. And I managed to do it after trial and error testing with 11 published versions of containers!
So as for this blog, I only want to track two things. Firstly, I want to track how many people click on the links inside my posts (aka outbound links) and secondly, I want to see what are the things people are clicking on my blog.
So for this I use Google Tag Manager Link Click Listener and Click Listener. The below is the step-by-step guide of how I did it. Also, I am trying not to be too technical about this because I am also not a tech person so trying to make this as DIY guide.
How to set up Link Click Listener in Google Tag Manager
First of all, you will need to set up a container in Google Tag Manager. You can do it easily by going to https://www.google.com/tagmanager and set up account, create a new container.
Once you got the container, you should be able to see the below interface.

Don’t worry about all the tags here for now. I’ll go through that later.
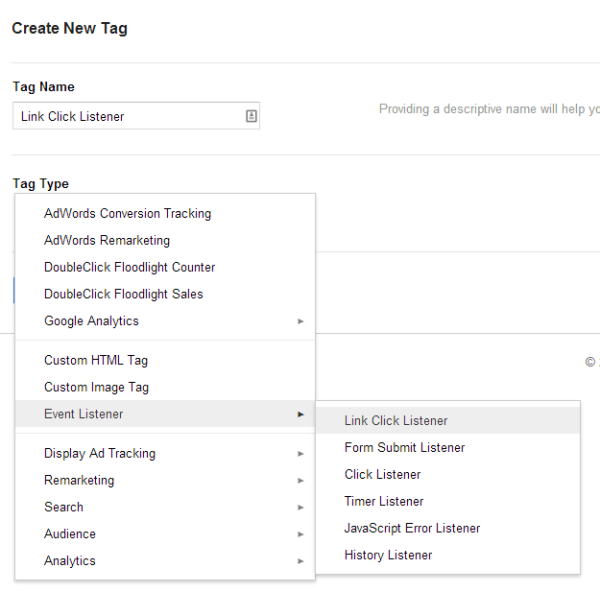
After that, you need to set up a link click listener tag. Link Click listener tag is basically the tag that records whenever someone clicks a link on your website.
The below is the brief description of how these link click listener and click listener tags work. (Image credit to Cutroni)

To set up a link click listener in GTM, you need to create link click listener.
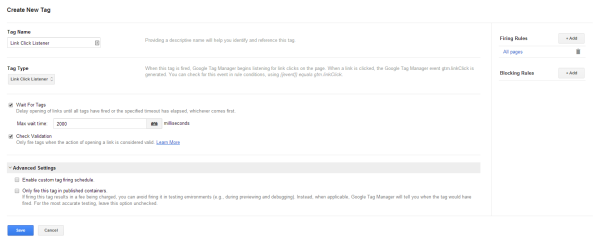
Step 3: You need to choose when you want your tag to be fired. For me, I want to fire it on all pages so I choose all.

Step 4: Under Firing Rules, you can choose from existing rules, like choose all pages. I choose all pages because I want to track all outbound links on all my pages.

Step 6: Viola, done. You have now set up Link Click Listener in your GTM Tag.
“When this tag is fired, Google Tag Manager begins listening for link clicks on the page. When a link is clicked, the Google Tag Manager event gtm.linkClick is generated. You can check for this event in rule condition, using {{event}} equals gtm.linkClick.”
The below is how you can set up Event tracking for Outbound links using GTM.


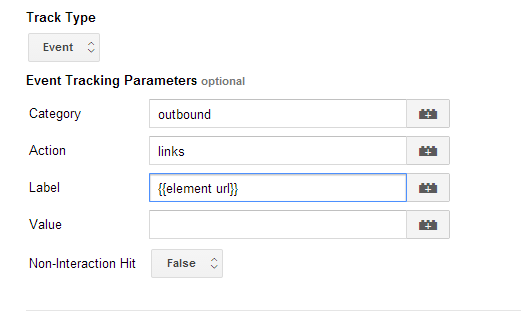
Element url: This macro stores the value of the href or action attribute of that element that triggered the event. For example, a click on the link < a href=”http://www.zinkohlaing.blogspot.com”>zinkohlaing’s blog</a> will give you the value of “http://www.zinkohlaing.blogspot.com” in GA data. So basically, you will see the URLs of the links clicked in GA without even having to tag them manually! Hooray!
Element target: This macro stores the value of target attribute that element that triggered the event. This value is stored in the gtm.elementTarget variable in data layer.
Element id: This macro is the value of the id attribute of the element. For example, a click on the link < a href=”http://www.zinkohlaing.blogspot.com” id=”zkh_blog”>zinkohlaing’s blog</a> will give you the element id value of zkh_blog. This value is stored in the gtm.elementID variable in data layer.
Step 7: We have add in Firing Rules. Click on +Add to Firing Rules and add a new rule as below.

Why you have to add in this rule? It is because as I mentioned earlier, GTM Link Click Listener Tag will generate an event called “gtm.linkClick” everytime a link is being clicked on the site. As such, we need to create a rule to fire this event tag only when the {{event}} equals to gtm.linkClick.
Step 7.1: Click Save to Firing rule and Click Save to save the tag.
Step 8: You are done! Successfully set up a Link Click Listener Event in GTM!
Bonus Note: The below is how you will see the data in your GA Events Report. (Event Category as First Dimension and Event Label as Secondary Dimension)

Setting up click listener is the same steps as link click listener set up.
To set up a click listener in GTM, you need to create link click listener.
Step 1: Name your tag whatever you like, for me I named as “Click Listener”
Step 2: Choose Tag Type as Click Listener tag. It is under Event Listener> Click Listener

Step 3: Same as link click listener set up, you need to choose when you want this tag to be fired. I want to it to be fire on all pages so I choose all pages rule.
Step 4: Click Save to Save the tag.
Next step, you need to set up Event tracking for this Click Listener. Click Listener works in the same way as Link Click Listener. When this tag is fired, Google Tag Manager begins listening for all types of clicks (e.g. button clicks, link clicks, etc) on the page. When a click occurs, the Google Tag Manager event gtm.click is generated. You can check for this event in rule conditions, using {{event}} equals gtm.click. To check whether a specific element was clicked, such as the “add to cart” button, add a rule like {{element id}} equals addToCart.
The next step is how to set up Event Tracking for this Click Listener tag.
Step 1: Create a new Tag.
Step 2: You can name whatever you want for this tag. I named it as Clicks Events Tracking.
Step 3: In Tag Type, choose Google Analytics and for me, since I used Universal Analytics (which I strongly recommend to use), choose Universal Analytics.

Step 4: In Track Type, Choose Event. The below is how I set up.
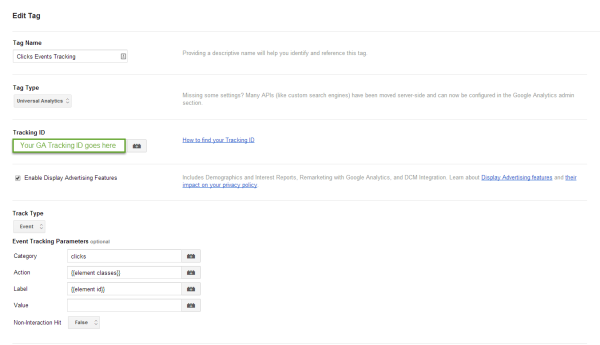
As you can see, I hard-coded Event Category as clicks so that I can categorize. It is up to decide which one you want to put in as Event Category. For example, you can put {{element id}} as Event Category and then you should be able to see the HTML element that the user clicked on. In Action, I put to capture {{element classes}} and in label, I put to capture {{element id}} as these are more descriptive.
Please note that these are not exactly rule-of-thumb to follow and you can just play around with these macros to see how you want to see data in GA Events reports.
Next is to set up firing rule for this. Click on +Add button on Firing Rules to add below rule.

Now I guess you will understand why I put gtm.click as {{event}} equals rule 😀
Final Step: Click “Save” and you have now successfully set up Click Listener in GA.
The below is the report I see in my GA setting up {{element id}} as Event Label.

Yup, that’s how you do it! To sum up, Google Tag Manager is very nice tool if you know how to use it and it has many advantages over traditional javascript tagging. All you have to do is install GTM Snippet in your code and you can make all changes just from the interface. Long live Macros!
Cheers,
Zinko
Note: This post also appears on zinkohlaing.blogspot.com and www.sparkline.com/2014/05/15/link-click-listener-clicks-listener-work-google-tag-manager/
Be First to Comment